How to Draw the Cat in the Hat
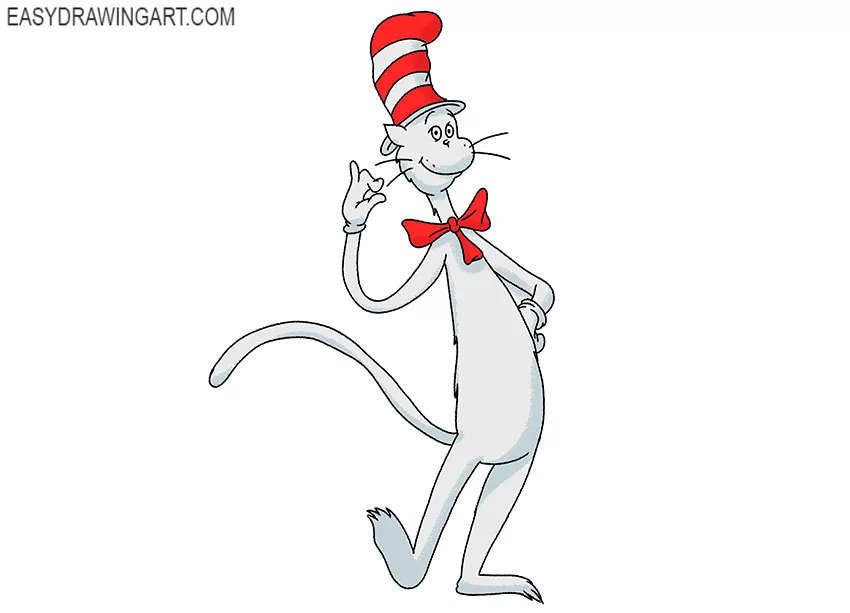
We are pleased to present a clear and accessible guide on how to draw the Cat in the Hat – the main character of the story by American author Dr. Seuss.
The cat has a slender body, long limbs, and a long tail. These proportions give the cat a very distinctive look.
A tall cap on its head and a bow tie around its neck add a special charm. Now, you need to draw all these elements.
Pay close attention at every stage of the drawing process and carefully draw all the lines marked in red.
Step 1: Sketch the Cat in the Hat’s body
Draw an oval for the Cat in the Hat’s head and a larger elongated oval for the torso. Connect the forms with a curved central guideline that establishes the direction of the character’s pose.

Step 2: Mark the cat character’s limbs and tail
Use thin curved lines to indicate the positions of both arms and legs. Extend another long guideline from the lower torso to mark the direction and curve of the striped cat tail.

Step 3: Outline the Cat in the Hat’s head
Refine the head around the oval guide, forming the cheek, chin, and pointed ear. Shape the projecting muzzle with curved lines, then add several long whiskers extending from both sides.

Step 4: Draw the Cat in the Hat’s face and hat
Inside the head, draw the oval cat eyes, curved eyebrows, and small nose. Above the head, outline the tall hat with a wide brim and several horizontal stripes.

Step 5: Add the cartoon neck and bow tie
Connect the head to the upper torso with two short neck lines. Below the chin, draw the large bow tie with a rounded center and two broad curved loops.

Step 6: Draw the Cat in the Hat’s torso
Trace the elongated body shape with smooth lines, keeping the upper torso narrow beneath the bow tie. Widen the sides gradually toward the hips to form the cartoon cat’s long body.

Step 7: Draw the fairy tail character’s raised arm
Build the raised arm around its guideline with two curved contours. At the end, draw the open hand with a rounded palm and long separated fingers.

Step 8: Draw the Cat in the Hat’s bent arm
Outline the second arm around the remaining guide, bending it toward the waist. Draw the forearm resting against the side and add the hand with several curved fingers near the hip.

Step 9: Add the fairy tale character’s first leg
Use the lower guideline to shape the first long leg with slightly curved sides. At the bottom, widen the form into a large foot and divide the front edge into several pointed toes.

Step 10: Draw the Cat in the Hat’s raised foot
Outline the second leg around its curved guide and bend it backward at the knee. Form the lifted foot at the end, then add the visible toes along its upward-facing front edge.

Step 11: Complete the Cat’s tail
Use the long curved guide to outline the cat tail with two flowing contours. Taper it gradually from the base near the torso to the rounded tip.

Step 12: Clean up the line drawing
Erase the original head, torso, limb, and tail guides. Restore any contours interrupted by the construction lines and leave a clear outline of the hat, face, body, paws, and tail.

Step 13: Add color the Cat in the Hat
Color the cat’s fur dark gray and leave the muzzle, chest, and hands white. Fill the hat stripes and bow tie with red, keep the remaining hat sections white, and add darker gray shadows.
That brings the tutorial to an end, and now you know how to draw the Cat in the Hat. Another recognizable feline character can be drawn in the tutorial on drawing the Cheshire Cat.
If you enjoyed this lesson, please leave a brief comment. Follow us on social media so you don’t miss any new drawing tutorials.